게임 콘텐츠의 구조
게임 제작을 위해 언리얼 엔진은 자체적으로 설계한 프레임워크를 제공함.
이를 게임플레이 프레임워크(Gameplay Framework)라고 부름.
언리얼 게임 프레임워크의 각 구성 요소를 파악하고, 이를 확장하면서 게임을 제작하는 것을 권장.

예제의 Step1 맵은 상자 3개를 얻으면 승리, 맵 밖으로 나가면 사망하는 구조.

사용된 게임 프레임워크 기능
월드(World)
- 게임 콘텐츠를 담기 위해 제공되는 가상의 공간
- 월드는 시간, 트랜스폼, 틱을 서비스로 제공.
- 월드 세팅이라는 콘텐츠 제작을 위한 기본 환경 설정을 제공.
- 월드의 기본 단위는 액터(Actor)로 정의되며, 액터 클래스는 언제나 접두사 A를 사용.
월드의 역할
- 게임 콘텐츠를 담는 공간 (Transform)
- 게임 콘텐츠의 진행 (Tick)
- 게임 흐름을 위한 시간 (Time)
- 기본 환경 설정 (World Setting)
- 월드의 단위 구성 요소 (Actor)
게임 모드(Game Mode)
- 게임 규칙을 지정하고 게임을 판정하는 최고 관리자 액터. 형태가 없음.
- 언리얼 엔진에서 하나의 게임에는 반드시 하나의 게임 모드만 존재.
- 게임 모드에서 입장할 사용자의 규격을 지정할 수 있음.
- 멀티 플레이어 게임에서 판정을 처리하는 절대적 권위의 심판.
게임 모드의 역할
- 플레이어 입장 관리
- 게임의 최종 승패 관리
- 게임의 규칙 관리
- 게임 데이터 검증 (멀티 플레이 게임)
기믹(Gimmick)
- 게임 진행을 위한 이벤트를 발생시키는 사물 액터
- 주로 이벤트 발생을 위한 충돌 영역을 설정하는데, 이를 트리거(Trigger)라고 함.
- 트리거를 통해 캐릭터와 상호 작용하고, 월드에 액터를 스폰해 콘텐츠를 전개함.
기믹의 역할
- 월드 내 사물과 상호 작용을 수행
- 지정된 조건을 만족하면 이벤트를 발생
- 월드에 물체를 스폰(Spawn)시킬 수 있음
플레이어(Player)
- 게임에 입장한 사용자 액터. 형태가 없음
- 게임 모드의 로그인을 통해 사용자가 게임 월드에 입장하면 플레이어가 생성됨.
- 싱글 플레이 게임에는 0번 플레이어가 설정됨
- 사용자와 최종 커뮤니케이션을 담장. (예) 입력 장치의 해석, 화면 장치로의 출력)
플레이어의 역할
- 게임에 입장한 사용자와 1:1 대응
- 사용자의 현재 상태 및 데이터 관리
- 사용자 입력의 1차 처리 (필요 시)
- 사용자 화면에 대응하는 카메라 관리
- 사용자 화면에 나타나는 HUD UI 관리
폰(Pawn)
- 무형의 액터인 플레이어가 빙의해 조종하는 액터
- 길찾기를 사용할 수 있으며, 기믹 및 다른 폰과 상호작용함
- 폰 중에서 인간형 폰을 별도로 캐릭터라고 지칭.
폰의 역할
- 빙의(Possess)를 통해 플레이어와 연결
- 사용자 입력의 실제 처리
- 사용자 화면에 대응되는 카메라 설정
- 기믹과의 상호작용
- 현재 상태에 적합한 애니메이션 재생
최종 예제 콘텐츠의 구성
최종 프로젝트에서는 가급적 블루프린트를 사용하지 않고 C++로만 제작. 이후에 블루프린트로 확장 가능.
1단계
월드 설정과 게임 모드 생성
↓
2단계
플레이어 폰의 입출력 및 모션 설정
↓
3단계
캐릭터에 반응하는 기믹 설계
↓
4단계
게임 데이터와 NPC 인공지능
↓
5단계
UI 연동 및 게임 제작 마무리
최종 예제에서 확장할 내용
- 기본 템플릿을 사용하지 않고 직접 제작
- 두 가지의 카메라 모드를 제공 (솔더뷰, 탑뷰)
- 액션 입력을 통한 콤보 공격의 구현
- 아이템 애셋을 활용한 무기 상자의 구현
- NPC 레벨 정보를 스프레드 시트로 관리
- 플레이어와 전투하는 NPC 인공지능의 구현
- UI 연동과 게임의 마무리
프로젝트
C++ Blank 템플릿
프로젝트 이름은 ArenaBattle.
- 주 게임 모듈 이름은 자동으로 ArenaBattle로 지정됨
프로젝트 소스코드 폴더 규칙
게임 플레이를 구성하는 요소별로 폴더를 제작해 관리
- Game: 게임 모드와 게임 설정에 관련된 클래스 [1강에서 생성]
- Gimmick: 기믹 배경 물체에 관련된 클래스
- Player: 플레이어에 관련된 클래스 [1강에서 생성]
- Input: 플레이어 입력에 관련된 클래스
- Character: 기본 캐릭터와 PC 및 NPC에 관련된 클래스 [1강에서 생성]
- Action: 캐릭터 액션에 관련된 클래스
- Item: 캐릭터 아이템에 관련된 클래스
- Stat: 캐릭터 스탯에 관련된 클래스
- AI: NPC 인공지능에 관련된 클래스
- UI: UI에 관련된 클래스
- Physics: 물리 충돌체 설정에 관련된 전처리기
- Interface: 인터페이스 클래스
클래스 생성 규칙
- 모든 클래스는 AB(ArenaBattle)의 접두사로 시작
- 폴더마다 다른 폴더와의 의존성을 최소화
- 다른 폴더의 클래스에 접근할 때는 가급적 인터페이스를 통해 접근
- 헤더 경로를 찾기 쉽도록 모듈.Build.cs 파일에 모듈의 폴더를 Include 경로에 설정
- PublicIncludePaths.AddRange( new string[] {”모듈 이름”});
한 폴더에서 다른 폴더의 헤더를 직접 참조하지 않도록 구성하는 것이 바람직함.
최초 생성할 클래스
게임을 구성하는 기본 골격의 설정
- 캐릭터는 PC와 NPC를 구분해 구현
- 게임 모드에서는 입장할 플레이어의 규격을 지정
- (AABPlayerController, AABCharacterPlayer)

생성한 프로젝트의 Content 폴더에 예제 프로젝트 ArenaBattle을 복사.
Content Browser에 뜨게 되는데 안뜨면 에디터 껐다켜기.

Basic으로 새 레벨 제작
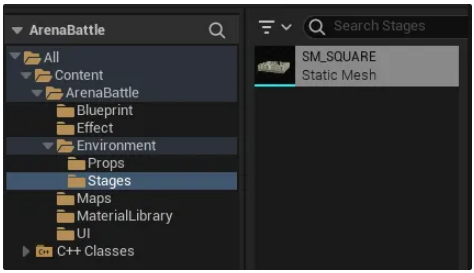
바닥을 지우고 0,0,0 위치에 메쉬 배치

Place Actors에서 Player Start 끌어 배치.
Window / Place Actors를 활성화하면 창이 뜸
Player와 Player가 빙의한 Pawn이 Player Start에서 생성됨.
오브젝트를 선택하고 end 키를 누르면 바닥에 딱 붙일 수 있음.
File / Save Current Level As...로 현재 레벨 저장
언리얼은 보통 Maps라는 폴더를 만들어서 작업한 레벨과 월드를 저장함.

Project Setting에서 에디터가 실행될 때 바로 로딩할 레벨을 설정

Game Mode Base를 상속받아 C++ 클래스 생성

Game 폴더를 만들어 그 아래에 생성
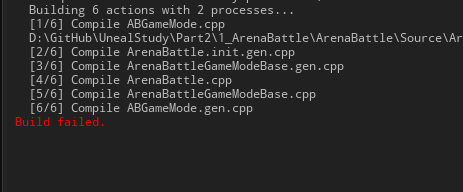
경로가 맞지 않아 빌드 실패함.
ArenaBattle.Build.cs에 PublicIncludePaths.AddRange(new string[] { "모듈 이름" }); 추가해준 뒤 다시 빌드 (Ctrl+Alt+F11)
// Copyright Epic Games, Inc. All Rights Reserved.

using UnrealBuildTool;

public class ArenaBattle : ModuleRules
{
	public ArenaBattle(ReadOnlyTargetRules Target) : base(Target)
	{
		PCHUsage = PCHUsageMode.UseExplicitOrSharedPCHs;

		PublicIncludePaths.AddRange(new string[] { "ArenaBattle" });

		PublicDependencyModuleNames.AddRange(new string[] { "Core", "CoreUObject", "Engine", "InputCore" });

		PrivateDependencyModuleNames.AddRange(new string[] {  });

		// Uncomment if you are using Slate UI
		// PrivateDependencyModuleNames.AddRange(new string[] { "Slate", "SlateCore" });

		// Uncomment if you are using online features
		// PrivateDependencyModuleNames.Add("OnlineSubsystem");

		// To include OnlineSubsystemSteam, add it to the plugins section in your uproject file with the Enabled attribute set to true
	}
}
ArenaBattle.Build.cs
빌드가 완료되면 Player Controller를 상속받은 ABPlayerController와 Character를 상속받은 ABCharacterBase 클래스도 각 파일에 생성.

ABCharacterBase를 상속받는 ABCharacterPlayer 클래스도 생성


Content Browser에 Add에서 Add Freature or Content Pack 클릭
Third Person 템플릿 추가
레벨에서 3인칭 템플릿을 제공하고 있는 게임 모드를 지정하게 되면 그 게임 모드를 사용해서 캐릭터가 로그인하고 등장하게 됨.


Outliner에서 레벨에 우클릭 - World Setting을 열고 GameMode Override에서 BP_ThirdPersonGameMode 선택 후
게임 플레이를 누르면 마네킹 캐릭터가 등장함.
이후 직접 만든 캐릭터로 변경 예정.

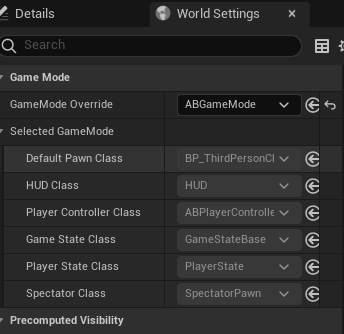
World Setting의 Selected GameMode 아래
Default Pawn Class: 등장시킬, 조종할 캐릭터 사물에 대한 클래스를 지정하는 것
Player Controller Class: 언리얼에서 기본으로 제공하는 플레이어 컨트롤러 사용 중.

GameMode를 아까 생성했던 ABGameMode로 변경하면 아직 아무값이 들어있지 않아 언리얼에서 제공하는 기본 클래스를 사용해서 플레이어를 스폰하도록 설계되어있음.
GameMode 설정
PlayerControllerClass 설정
// Fill out your copyright notice in the Description page of Project Settings.

#pragma once

#include "CoreMinimal.h"
#include "GameFramework/GameModeBase.h"
#include "ABGameMode.generated.h"

/**
 *
 */
UCLASS()
class ARENABATTLE_API AABGameMode : public AGameModeBase
{
	GENERATED_BODY()

public:
	AABGameMode();

};
ABGameMode.h
// Fill out your copyright notice in the Description page of Project Settings.


#include "Game/ABGameMode.h"
#include "ABGameMode.h"
#include "Player/ABPlayerController.h"
// PlayerController 클래스 정보 가져오기

AABGameMode::AABGameMode()
{
    // 멤버 변수 값 설정
    // DefaultPawnClass

    // PlayerControllerClass에 AABPlayerController 클래스 설정
    PlayerControllerClass = AABPlayerController::StaticClass();
}
ABGameMode.cpp

AABPlayerController는 C++ 클래스이기 때문에 AABGameMode의 생성자에서 PlayerControllerClass 값을 AABPlayerController로 지정해준 뒤 컴파일 해보면 World Setting의 값이 변경된 것을 확인할 수 있다.
Default Pawn Class 설정
Default Pawn Class은 BP_ThirdPersonCharacter로 변경할텐데, C++ 클래스가 아니기 때문에 애셋으로부터 클래스 정보를 얻어와야함. 이것도 엄연히 Character를 상속받은 언리얼 체계에서의 클래스 구조를 따르기 때문에 클래스 정보를 얻어올 수 있음.

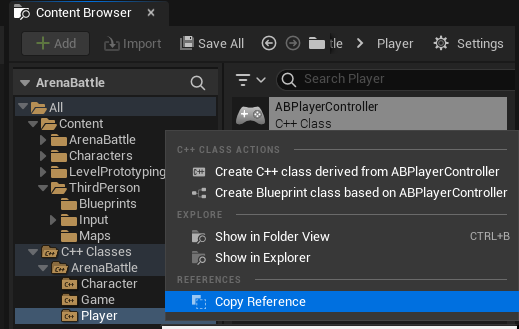
BP_ThirdPersonCharacter 애셋에 우클릭 후 Copy Reference로 애셋 주소 복사
경로 /Script/Engine.Blueprint'/Game/ThirdPerson/Blueprints/BP_ThirdPersonCharacter.BP_ThirdPersonCharacter' 에서 앞부분과 따옴표는 지우고 애셋 경로만 사용하며,
클래스 정보를 가져올 것이기 때문에 BP_ThirdPersonCharacter 애셋 이름 뒤에 _C를 붙여줌
/Game/ThirdPerson/Blueprints/BP_ThirdPersonCharacter.BP_ThirdPersonCharacter_C
// Fill out your copyright notice in the Description page of Project Settings.


#include "Game/ABGameMode.h"
#include "ABGameMode.h"
#include "Player/ABPlayerController.h"
// PlayerController 클래스 정보 가져오기

AABGameMode::AABGameMode()
{
    // 멤버 변수 값 설정
    // DefaultPawnClass 지정
    // 애셋에 담긴 클래스 정보를 얻어와서 설정해줌
    // 생성자 코드이기 때문에 ConstructorHelpers 함수를 사용해서 애셋 정보를 가져올 수 있음.
    // Pawn 클래스로 상속을 받았기 때문에 APawn으로 찾음
    static ConstructorHelpers::FClassFinder<APawn> ThirdPersonClassRef(TEXT("/Game/ThirdPerson/Blueprints/BP_ThirdPersonCharacter.BP_ThirdPersonCharacter_C"));
    if (ThirdPersonClassRef.Class)
    {
        // 해당 레퍼런트 안에 있는 클래스 정보가 null이 아니라면
        // DefaultPawnClass 값을 ThirdPersonClassRef.Class로 지정
        DefaultPawnClass = ThirdPersonClassRef.Class;
    }

    // PlayerControllerClass에 AABPlayerController 클래스 설정
    PlayerControllerClass = AABPlayerController::StaticClass();
}
ABGameMode.cpp
다시 빌드하면 World Setting의 값이 변경되어 있다. (라이브 코딩으로 반영되지 않을 때는 에디터를 껐다 켜기. 생성자 구문을 변경했을 때에는 에디터를 껐다 켜주는 것이 확실함)
게임이 시작되면 자동으로 마우스가 뷰 포트에 들어가도록 설정.
게임이 시작할 때 마우스 입력 (Mouse Input)을 뷰포트로 옮겨주는 코드를 작성해야함.
// Fill out your copyright notice in the Description page of Project Settings.

#pragma once

#include "CoreMinimal.h"
#include "GameFramework/PlayerController.h"
#include "ABPlayerController.generated.h"

/**
 *
 */
UCLASS()
class ARENABATTLE_API AABPlayerController : public APlayerController
{
	GENERATED_BODY()

protected:
	// 게임 시작 시 실행되는 함수
	virtual void BeginPlay() override;

};
ABPlayerController.h
// Fill out your copyright notice in the Description page of Project Settings.


#include "Player/ABPlayerController.h"

void AABPlayerController::BeginPlay()
{
    // 상속 받았기 때문에 Super로 한번 실행
    Super::BeginPlay();

    // FInputModeGameOnly는 구조체,
    // SetInputMode 함수에 FInputModeGameOnly 구조체를 넘겨주면
    // 시작하자마자 포커스가 뷰 포트 안으로 들어감
    FInputModeGameOnly gameOnlyInputMode;
    SetInputMode(gameOnlyInputMode);
}
ABPlayerController.cpp
컴파일 후 게임을 시작하면 자동으로 포커스가 뷰포트에 들어감. 마우스를 꺼내고 싶을 때는 Shift+F1이나 esc.
게임모드에서 헤더로 include하지 않고 ABPlayerController 클래스를 설정하는 방법.
우리가 만든 C++ 객체들은 계층구조, 폴더 구조로 되어 있는데 독립적인 파일로 구성되지 않지만 고유한 경로를 가짐.
ABPlayerController의 경우에도 고유 주소값을 가지고 있음.
BP_ThirdPersonCharacter를 추가했던 것처럼 주소를 사용하면 헤더를 include하지 않고 클래스 정보를 얻어올 수 있음.
// Fill out your copyright notice in the Description page of Project Settings.


#include "Game/ABGameMode.h"
#include "ABGameMode.h"
//#include "Player/ABPlayerController.h"
// PlayerController 클래스 정보 가져오기
// 애셋으로부터 직접 참조를 받으면 헤더를 추가하지 않아도 됨

AABGameMode::AABGameMode()
{
    // 멤버 변수 값 설정

    // DefaultPawnClass 지정
    static ConstructorHelpers::FClassFinder<APawn> ThirdPersonClassRef(TEXT("/Game/ThirdPerson/Blueprints/BP_ThirdPersonCharacter.BP_ThirdPersonCharacter_C"));
    if (ThirdPersonClassRef.Class)
    {
        // 해당 레퍼런트 안에 있는 클래스 정보가 null이 아니라면
        // DefaultPawnClass 값을 ThirdPersonClassRef.Class로 지정
        DefaultPawnClass = ThirdPersonClassRef.Class;
    }

    // PlayerControllerClass에 AABPlayerController 클래스 설정
    // AABPlayerControllerClassRef는 클래스 정보가 바로 복사된 것이기 때문에 _C를 붙이지 않음
    static ConstructorHelpers::FClassFinder<APlayerController> PlayerControllerClassRef(TEXT("/Script/ArenaBattle.ABPlayerController"));
    if (PlayerControllerClassRef.Class)
    {
        PlayerControllerClass = PlayerControllerClassRef.Class;
    }
    //PlayerControllerClass = AABPlayerController::StaticClass();
}
ABGameMode.cpp
'게임 개발 > 언리얼 5' 카테고리의 다른 글
| 언리얼5 - 캐릭터 컨트롤 설정 (0) | 2024.11.25 |
|---|---|
| 언리얼5 - 캐릭터와 입력 시스템 (1) | 2024.11.24 |
| 언리얼 시작 프로젝트 에러 - unable to start debugging. check your debugger settings by opening project properties... (0) | 2024.11.08 |
| 언리얼에서 코드 파일을 찾지 못할 때 (1) | 2024.11.08 |
| 언리얼5 - ProjectDecide enemy만들기 (0) | 2024.01.29 |